gsutil -m cp -r [source pathway to files to be uploaded/] gs:[destination pathway to folder on bucket/]Cloud Storage
Overview of the buckets
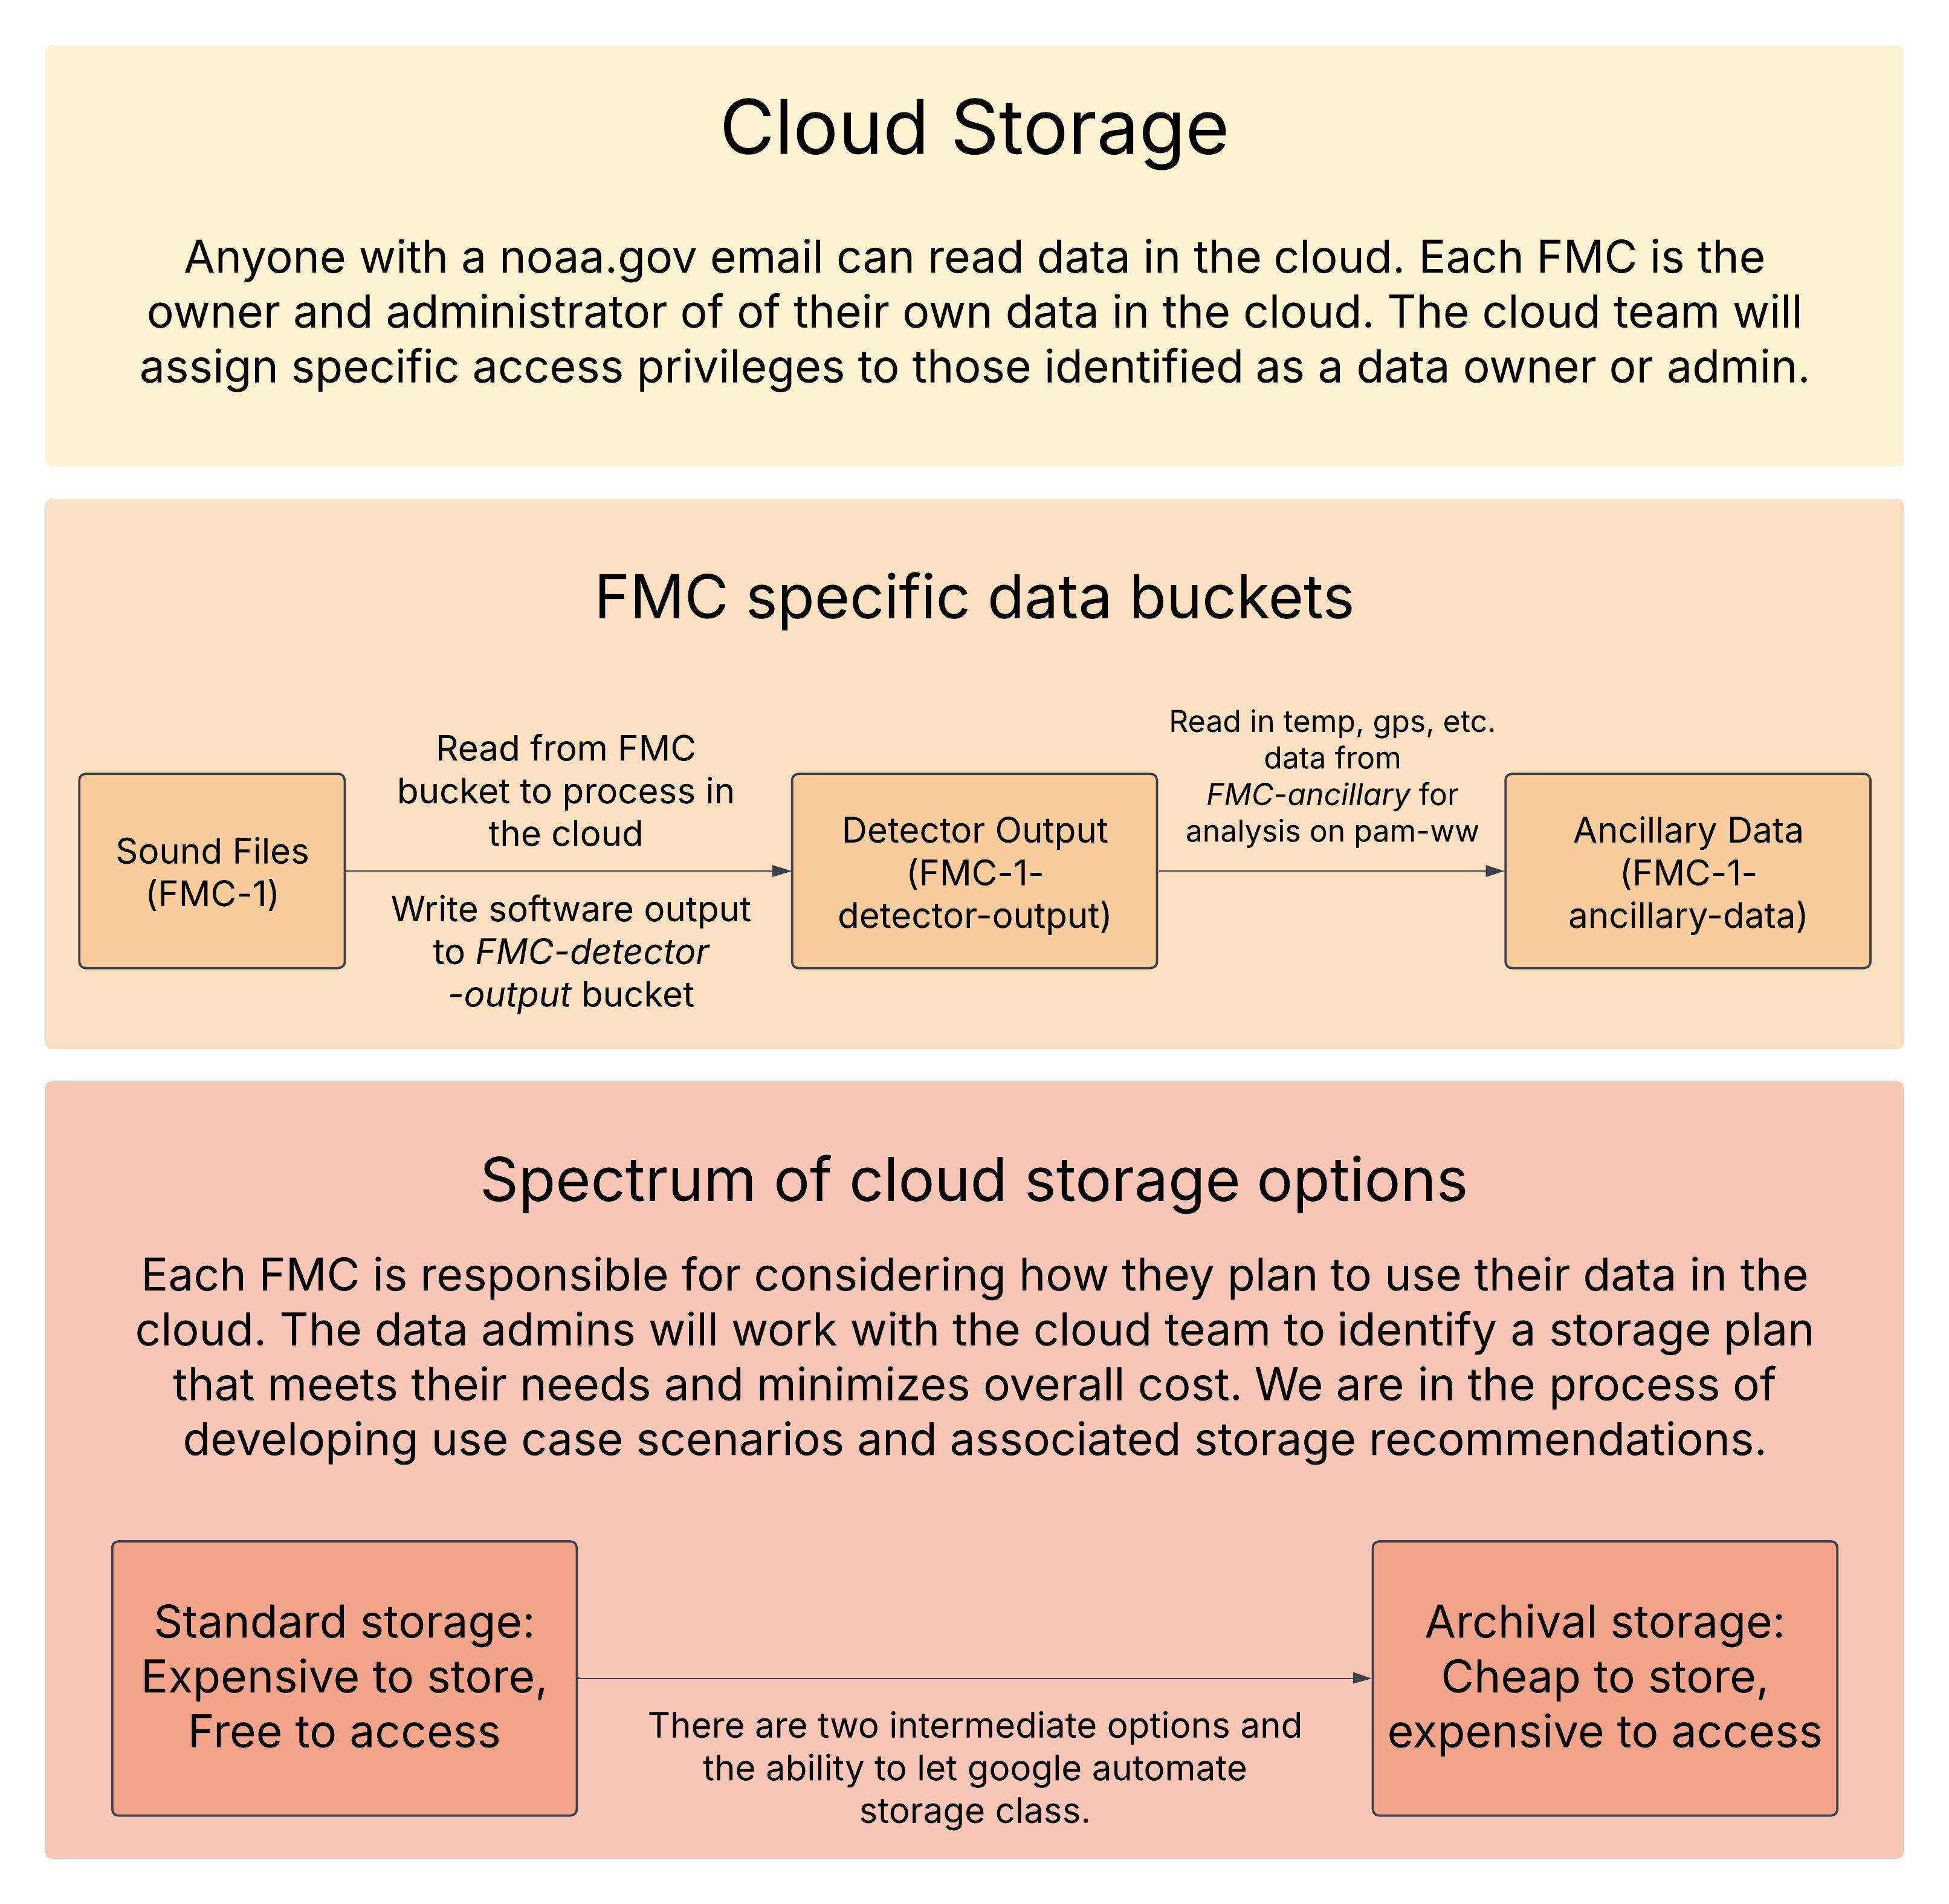
View and interact with cloud data through the National PAM Google Cloud Console(PAM GCP). Anyone with a noaa.gov email can read data in the PAM GCP. Each FMC will assign their own data owner and administrator for their cloud buckets. These roles come with their own unique access permissions. To view or edit who has read/write/delete permissions to your FMC data bucket visit this spreadsheet. The cloud developer (Dan Woodrich) will receive an automated email indicating that the spreadsheet has been updated and make the according changed. See suggested data organization structures here. This google document will be updated as we develop the National PAM GCP and each FMC becomes cloud operational.
Data stored in Google cloud has different storage classes available that vary in their cost to store and access data. It is the responsibility of each FMC Data Authority (Owner) to consider how they plan to use their data in the cloud and work with the Cloud Development to identify a storage plan that meets their needs and minimizes overall costs. Review this document for an overview of cloud storage definitions and data management options available.
Getting Started in the Cloud
Documentation for uploading data
Manual
Drag and drop upload
While manual “drag and drop” uploading is available, this is only suitable for very small file sizes or a handful of files. Larger data uploads should use one of the more automated options below
Open the GCP console
Navigate to the data bucket that you would like to upload to
Select “UPLOAD”, then either “Upload files” or “Upload Folder”
In the pop-up file explorer, select the files or folder that you would like to upload
Click “Upload”
Automating with Cloud sdk/gsutil
Uploading, Renaming and Deleting Files on the National PAM GCP
Required Setup
Google Cloud SDK
To upload files from your computer or server to the GCP, you will need to install the Google Cloud SDK (Software Development Kit; see the following section for full installation instructions). It is a collection of tools including the command line interface (gcloud CLI), cloud client libraries, and developer tools, designed to help developers manage resources and applications on the Google Cloud Platform (GCP) efficiently.
gsutil Tool
The gsutil tool is a Python application that allows access to the Cloud Storage from the command line interface. At this point, gsutil is a legacy Cloud Storage CLI and is minimally maintained, but still functions well for uploading, downloading, renaming objects, etc. It uses the prefix “gs://” to indicate a resource in the cloud (e.g., gs://bucket_name/object_name) and can be used with the Google Cloud SDK or Google Cloud Shell terminal (the terminal window in your browser window when you open the GCP).
Notes - Specifiy “-m” in your command for it to utilize parallel processing - Type ctrl-c to cancel or exit out of any command
Uploading Files to the GCP Using the Google Cloud SDK Terminal
To upload files from your computer or server to the GCP, you will need to download the Google Cloud CLI installer and use your computer’s terminal window with Google Cloud SDK installed. You cannot use the Google Cloud Shell terminal in your browser window to upload files as it cannot access files on your computer, only files that have already been uploaded to the GCP.
1. Download the Google Cloud CLI installer and install Cloud SDK on your computer. Make sure you select the single user option (should list your noaa email) when you go through the installation process, that way you won’t need admin approval.
2. Once you have the Google Cloud SDK Shell terminal window open (search for “cmd” or “Command Prompt” in your start menu’s search bar), follow the prompts and select ggn-nmfs-pamdata-prod-1 as your project, it should be listed as one of your options.
Once you see the “Cloud SDK>” then the terminal is ready for you to enter your next command.
3. Enter the follow command to upload files to the GCP:
Example: To upload sound files from the 5444_48kHz_UTC folder on the server to the GCP, enter the following command:
gsutil -m cp -r //nefscdata/PassiveAcoustics_Soundfiles/BOTTOM_MOUNTED/NEFSC_MA-RI/NEFSC_MA-RI_202011_COX02/NEFSC_MA-RI_202011_COX02_ST/5444_48kHz_UTC/ gs://nefsc-1/bottom_mounted/NEFSC_MA-RI/NEFSC_MA-RI_202011_COX02/NEFSC_MA-RI_202011_COX02_ST/Note: For the example above, if you have already made an NEFSC_MA-RI_202011_COX02_ST subfolder in the GCP, then this may create two duplicate subfolders (i.e., NEFSC_MA-RI_202011_COX02_ST/NEFSC_MA-RI_202011_COX02_ST). One workaround is to temporarily rename the 5444_48kHz_UTC folder on the server as NEFSC_MA-RI_202011_COX02_ST and then try uploading to the GCP. You can make a temporary folder titled “extra 5444_48kHz_UTC” in the deployment folder so you save the original file name and use it to rename the folder when the upload is complete.
Uploading Missing Files and Comparing Source/Destination Files on the GCP
There may be cases where you notice the number of files uploaded to your destination folder differs from the number of original files in your source folder. To check which files were or were not uploaded from your source location, and to then upload any missing files, use the Google Cloud SDK terminal window. You can run the ‘rsync’ command to compare the source and destination files and only upload what is different or missing.
Tip: For a full list of the various options/flags you can add to your rsync commands, run “gsutil help rsync” in your terminal window.
1. Enter the following command to check which files are missing from your GCP upload:
gsutil -m rsync -r -n [source pathway to files to be uploaded/] gs:[destination pathway to folder on bucket/]Note: the ‘n’ flag allows it to operate as a “dry run” and it will output what it plans to do. This command may take a while to run depending on how many files it needs to compare.
Example:
gsutil -m rsync -r -n //nefscdata/PassiveAcoustics_Soundfiles/BOTTOM_MOUNTED/NEFSC_MA-RI/NEFSC_MA-RI_202011_COX02/NEFSC_MA-RI_202011_COX02_ST/5444_48kHz_UTC/ gs://nefsc-1/bottom_mounted/NEFSC_MA-RI/NEFSC_MA-RI_202011_COX02/NEFSC_MA-RI_202011_COX02_ST/2. Enter the follow command to upload missing files on the GCP:
gsutil -m rsync -r [source pathway to files to be uploaded/] gs:[destination pathway to folder on bucket/]Example:
gsutil -m rsync -r //nefscdata/PassiveAcoustics_Soundfiles/BOTTOM_MOUNTED/NEFSC_MA-RI/NEFSC_MA-RI_202011_COX02/NEFSC_MA-RI_202011_COX02_ST/5444_48kHz_UTC/ gs://nefsc-1/bottom_mounted/NEFSC_MA-RI/NEFSC_MA-RI_202011_COX02/NEFSC_MA-RI_202011_COX02_ST/
Renaming/Deleting Files on the GCP Using the Google Cloud Shell Terminal
To rename or delete large batches of files, use the Google Cloud Shell terminal at the bottom of your browser window when you are on the NMFS GCP. Using the Cloud Shell terminal will keep traffic off of your network.
Note: The Google Cloud Shell terminal can only be used for renaming and deleting files that have already been uploaded to the GCP. It cannot be used to upload new files (you will need to use your computer’s terminal window with Google Cloud SDK as described in the previous section).
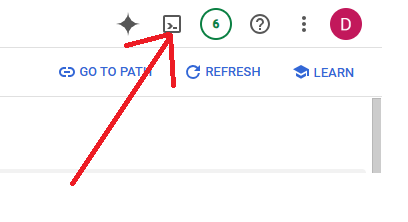
If you do not see the terminal window open at the bottom of your browser window, click this icon in the upper right corner of your screen:
Renaming Files/Pathways on the GCP
To rename files, use the Google Cloud Shell terminal at the bottom of your browser window when you are on the NMFS GCP.
Enter the following command to rename files/pathways that have already been uploaded to the GCP (i.e., when both source and destination are in the bucket):
gsutil -m mv gs:[old file pathway/] gs:[new file pathway/]Example: To add a subfolder to the end of the file pathway:
gsutil -m mv gs://afsc-1/bottom_mounted/CH01/202310/ gs://afsc-1/bottom_mounted/CH01/202310/AURAL/Bulk rename by pattern matching in Google Cloud Shell Terminal
This example was used to effeciently rename files based on simple pattern matching in Google Cloud Storage via the Google Cloud Shell. In cloud storage, the ‘mv’ (move; interpreted as cloud storage as a copy + delete) operation is equivalent to rename, as a true rename function does not exist in Google Cloud Storage. While this is more effecient than other methods (attempting to rename over mounts in pam-ww can trigger a download/upload, which is very time-inneffecient), note that it will still be treated as Google Cloud Storage as an access event and will cause the data to be elevated to standard storage, incurring additional charges temporarily under autoclass.
#This code is to rename files in GCP Storage buckets. In this example it loops through all files in a directory and removes the first instance of "20"
#Example below for .wav and .xml files (.log)
#This code is to be run in a linux shell, such as the Google Cloud Shell available to all PAM users at https://console.cloud.google.com/

#!/bin/bash
#Code below is for .wav file renaming

# --- Configuration ---
BUCKET="nefsc-1/bottom_mounted/NEFSC_SBNMS/NEFSC_SBNMS_201904_SB01/1677778970_48kHz"
# Example: Select all .wav files in any folder
PATTERN="**/*.wav"
# String to find and remove from the filename, just the first instance
STRING_TO_REMOVE="20"

# --- Main Script ---
# List all files matching the pattern, even in subdirectories
gcloud storage ls "gs://${BUCKET}/${PATTERN}" | while read -r full_path; do
  # Isolate the directory path (e.g., gs://my-bucket/reports)
  dir_path=$(dirname "$full_path")

  # Isolate the filename (e.g., sales_report.20.txt)
  filename=$(basename "$full_path")

  # Create the new filename by removing the target string from the isolated filename
  new_filename=$(echo "$filename" | sed "s/${STRING_TO_REMOVE}//")

  # Only proceed if the filename has actually changed
  if [[ "$filename" != "$new_filename" ]]; then
    # Construct the full new path
    new_full_path="${dir_path}/${new_filename}"

    echo "✅ Renaming: ${full_path}"
    echo "        to: ${new_full_path}"

    # Execute the move/rename command
    gcloud storage mv "$full_path" "$new_full_path"
  fi
done

echo "Done."

#######################################################

#!/bin/bash
#Code below is for .log.xml file renaming


# --- Configuration ---
BUCKET="nefsc-1/bottom_mounted/NEFSC_SBNMS/NEFSC_SBNMS_201904_SB01/1677778970_LOG-and_SUD"
# Example: Select all .xmlfiles in any folder
PATTERN="**/*.xml"
# String to find and remove from the filename, just the first instance
STRING_TO_REMOVE="20"

# --- Main Script ---
# List all files matching the pattern, even in subdirectories
gcloud storage ls "gs://${BUCKET}/${PATTERN}" | while read -r full_path; do
  # Isolate the directory path (e.g., gs://my-bucket/reports)
  dir_path=$(dirname "$full_path")

  # Isolate the filename (e.g., sales_report.20.txt)
  filename=$(basename "$full_path")

  # Create the new filename by removing the target string from the isolated filename
  new_filename=$(echo "$filename" | sed "s/${STRING_TO_REMOVE}//")

  # Only proceed if the filename has actually changed
  if [[ "$filename" != "$new_filename" ]]; then
    # Construct the full new path
    new_full_path="${dir_path}/${new_filename}"

    echo "✅ Renaming: ${full_path}"
    echo "        to: ${new_full_path}"

    # Execute the move/rename command
    gcloud storage mv "$full_path" "$new_full_path"
  fi
done

echo "Done."
Deleting All Files with a Known Prefix/Suffix from the GCP
Note: Be extremely careful with deleting files through gsutil. If you enter the wrong command, or enter a partially complete command, you could potentially delete a significant portion or all of the data in the bucket. It is recommended that you test out your command on a smaller folder first before moving to deleting larger batches of files.
You may need to request object delete permissions to your NOAA UMS account from your data administrator.
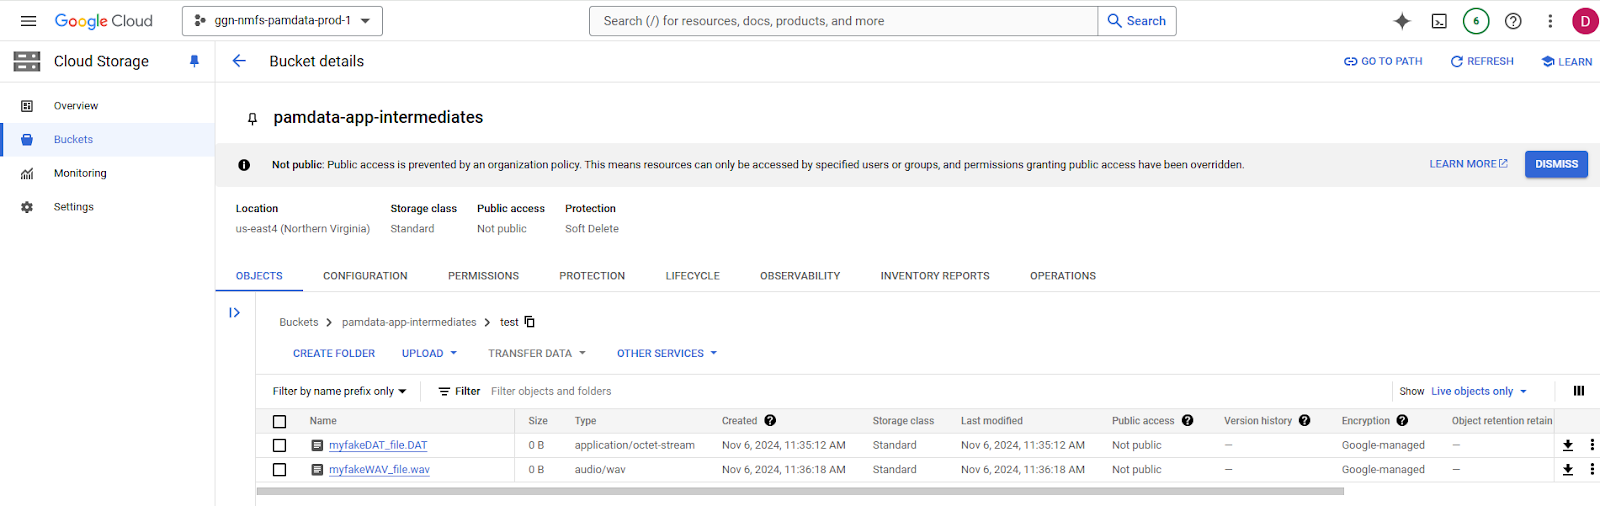
The following example provided by Dan removes all files with a suffix matching .DAT (it does not verify if the files are .DAT files prior to deletion). He uses a bucket in pamdata that is meant for temporary files to demonstrate this. You will want to substitute your intended bucket into this code (e.g., ost-1), replacing “pamdata-app-intermediates”.
1. Navigate to the cloud storage bucket in the GCP (the following screenshots use a different pamdata bucket meant for temporary data).
In this example, Dan placed two files (one .DAT and one .wav) in an example folder (aka prefix) in the bucket.
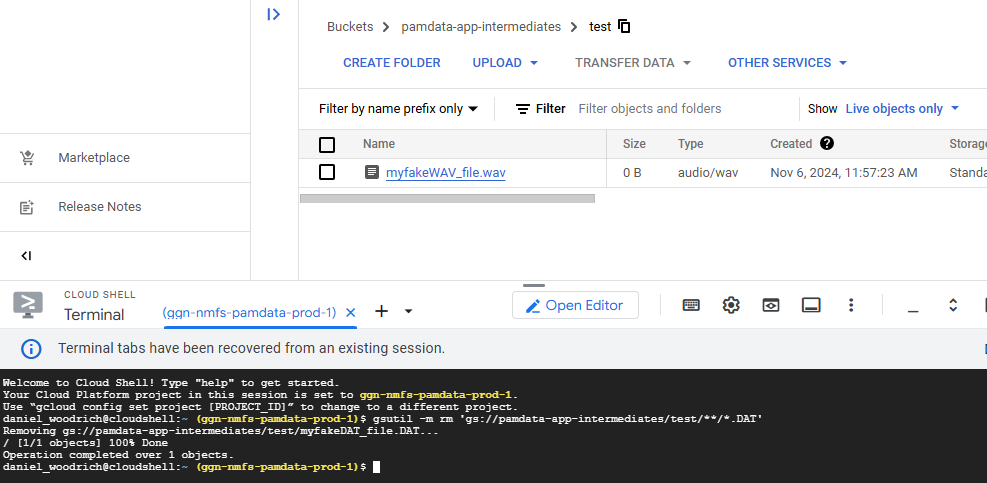
He also placed a .DAT file in a higher directory, to demonstrate how to limit the behavior based on prefix for finer scale deleting. 
2. In the top right corner, open the Google Cloud Shell in your browser.

3. Enter the following command to delete all files with .DAT in a specific folder (in this case, the /test/ folder) in your bucket.
The file prefix must be an exact match, so you can use it to test it on a smaller subset of data prior to the whole bucket if desired. With the following command, the operation is on the pamdata-app-intermediates bucket, but specific to only files within the /test/ prefix. Every file below the /test/ folder will also be deleted, even if in a child prefix.
Note: When you attempt to run it within the cloud shell, Google might ask you to confirm your identity, click ‘yes’ if prompted.
gsutil -m rm 'gs://pamdata-app-intermediates/test/**/*.DAT'
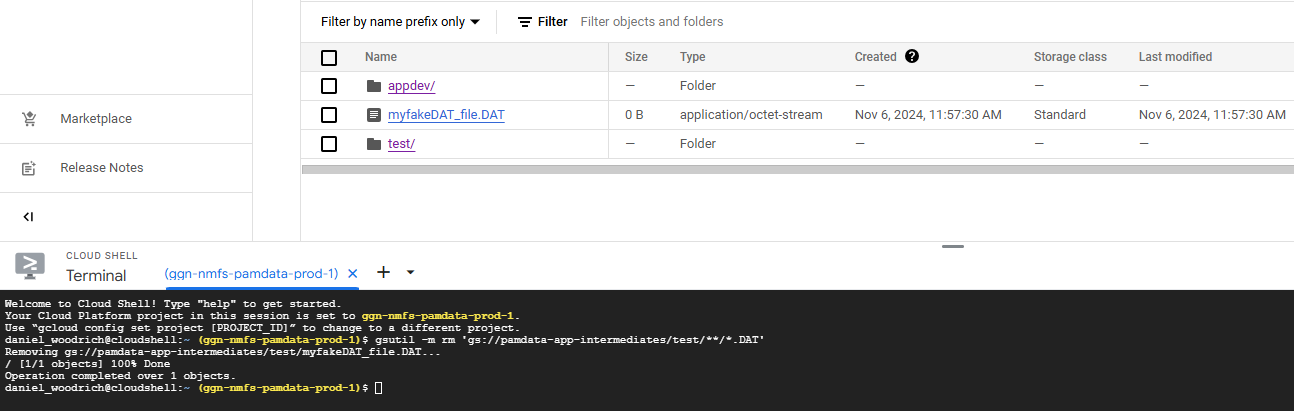
After running that code, the following will result. Notice the .wav file was untouched:

You can see that the .DAT file above the /test/ prefix was unaffected.
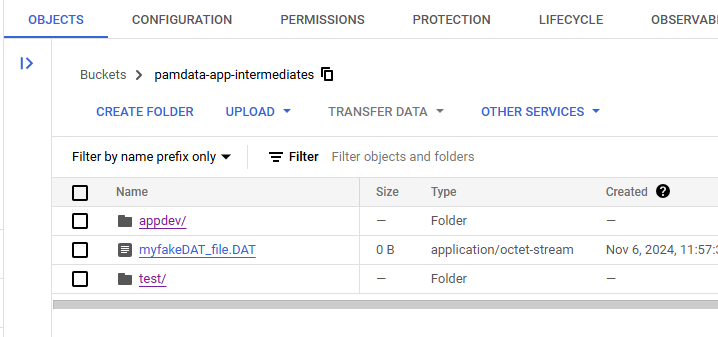
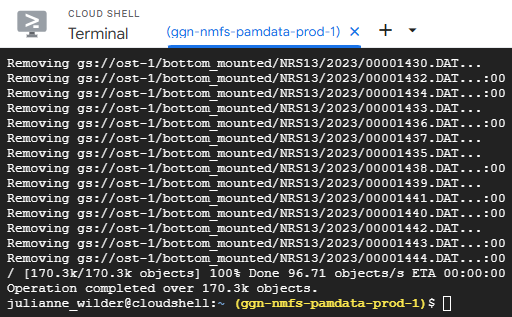
4. Enter the following command if you want to delete all .DAT files in the bucket and not make it more specific to all the files matching a certain prefix.
ALL files in the pamdata-app-intermediates bucket matching .DAT will now be deleted.
gsutil -m rm 'gs://pamdata-app-intermediates/**/*.DAT'After running that code, the following will result: 
When the deletion job is complete, the following message will appear in your cloud shell terminal and it will prompt you to enter a new line of code.
Errors and Troubleshooting
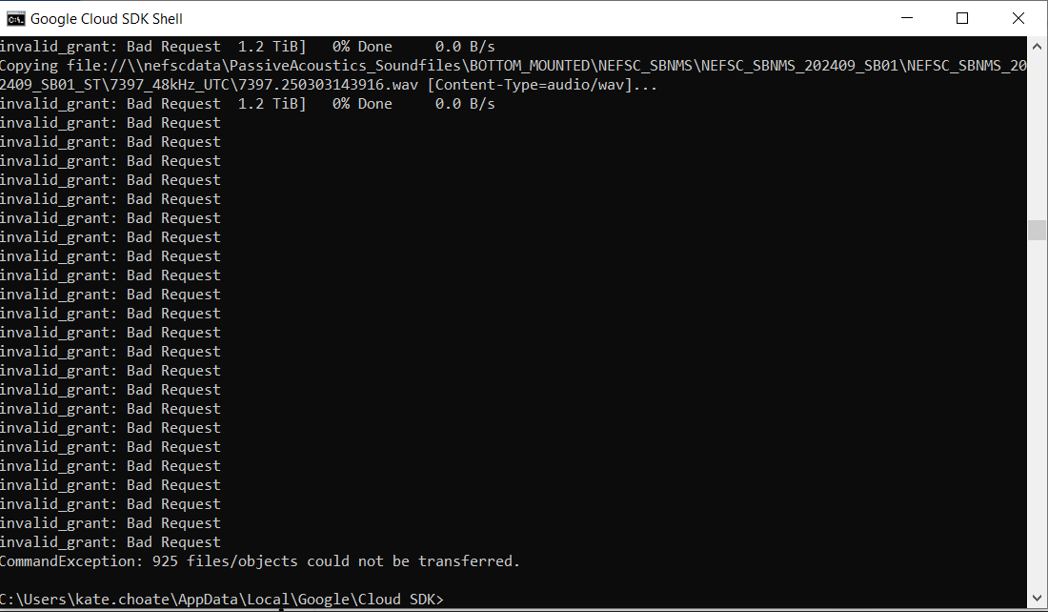
- If you attempt to upload files to the GCP but receive a series of errors reading “invalid_grant: Bad Request”, then try running the command “gcloud auth login” and try uploading your files again.
Science center specific reference for data upload
Direct Acoustic Data Upload to Cloud-AFSC
Result:
ASFC was able to upload 100TB of acoustic data to our GCP bucket over the internet connection in our science center (in Seattle) in a three week upload window with low operator effort, representing our whole primary acoustic data collection.
How:
Our research group committed two computers with normal user permissions in the AFSC data center to upload data from the AFSC LAN to our pamdata bucket. These two computers ran a simple script, which was written in R and wrapped calls to the GCP ‘gsutil’ tool. The script was very simple, about 50 lines. The script instructed the computers to only initiate uploads between the hours of 7pm and 6am on weekdays and constantly on weekends. The R sessions were logged so we could identify any early termination that might have resulted in partial or corrupted uploads. Additional process will be designed to check that the data was uploaded in full.
Impact:
AFSC IT would have been notified by the NMFS network team if the traffic were considered disruptive. They would have traced the traffic to the machines under my user name, and contacted me to ask questions. This not happening suggests that the traffic was a non-issue. Scheduling traffic within off-hours (nights and weekends) prevents throttling normal user traffic during working hours, and staying within these confines is respectful and normal practice for NMFS IT groups. We did not notify AFSC IT or the NMFS network team as we wanted to test the impact of this traffic empirically, but going forward, especially with multiple FMCs performing uploads concurrently, we advise approving the traffic with FMC & NMFS IT.
Contact:
Dan Woodrich daniel.woodrich@noaa.gov if you would like to explore a similar process for your FMC acoustic data.
R script for upload:
is_weekday = function(x){
  weekdays = c('Thursday','Friday','Monday','Tuesday','Wednesday')
  return(weekdays(x) %in% weekdays)
}

is_after_hours= function(x){
  return(as.integer(format(x,"%H")) < 6 | as.integer(format(x,"%H")) > 18)
}

#cloud data upload. This assumes you are uploading bottom_mounted data , and just uploads the full content of each folder below the 'moorings' folder. Adapt the logic to your needs but note renaming / reorganizing is more complex.

my_fmc_bucket_name = 'afsc-1'
my_top_level_data_path = "//161.55.120.117/NMML_AcousticsData/Audio_Data/Waves"
moorings = dir(my_top_level_data_path) #gets each subfolder of top level data path.

#log the job
sink(paste("//akc0ss-n086/NMML_CAEP_Acoustics/Detector/pam_si/upload_log_",Sys.info()['nodename'],".csv",sep=""), append=TRUE, split=TRUE)

work = list(1:200,201:length(moorings)) #in my case we had 435 moorings.
names(work) = c("computer1-name","computer2-name") #needs to match Sys.info()['nodename'] for computers you are using
moorings = moorings[work[[Sys.info()['nodename']]]]

for(mooring in moorings){

  #detect if it's a weekday during work hours, don't start a job.
  while(is_weekday(Sys.time()) & !is_after_hours(Sys.time())){
    cat(paste('waiting...',Sys.time(),"\n"))
    Sys.sleep(600) #wait 10 minutes until trying again.
  }

  #gsutil needs to be installed on the system through Google Cloud SDK. If you can open up a command line and run 'gsutil help' and recieve a response, the below line will work.
  string = paste("gsutil -m cp -r ",my_top_level_data_path,mooring," gs://",my_fmc_bucket_name,"/bottom_mounted/",mooring,sep="")
  cat(paste("started",mooring,"at",Sys.time(),"\n"))
  system(string,intern=TRUE)
  cat(paste("ended",mooring,"at",Sys.time(),"\n"))
  }
R script for continuous sync:
#if data volumes are low going forward and you don't care about managing traffic, all you have to do is:
#(and can task schedule this...)

#the below line deletes, WARNING

#_____
#gsutil -m rsync -r -d //161.55.120.117/NMML_AcousticsData/Audio_Data/Waves/ gs://afsc-1/bottom_mounted/
#______

#test with : GA23_AU_SU01. -n flag performs a 'dry run' - good to test as rsync can potentially delete files.
#gsutil -m rsync -r -n //161.55.120.117/NMML_AcousticsData/Audio_Data/Waves/GA23_AU_SU01 gs://afsc-1/bottom_mounted/GA23_AU_SU01

#note- d will delete. If need to delete, recommend handling that with more specificity.

#If the dataset size is large it takes a long time to check (as in AFSC case). can alteratively loop through those you suspect to have changed, or if you have specific ones you'd like to check:

sink("C:/Users/daniel.woodrich/Desktop/update_logs.csv", append=TRUE, split=TRUE)

local_moorings = dir("//161.55.120.117/NMML_AcousticsData/Audio_Data/Waves")
cloud_moorings = system("gsutil ls -d gs://afsc-1/bottom_mounted/*/",intern=TRUE)
cloud_moorings = basename(cloud_moorings)

moorings_to_load = local_moorings[which(!local_moorings %in% cloud_moorings)]

for(i in moorings_to_load){
  print(paste("Rsyncing: mooring",i))

  out = system(paste("gsutil -m rsync -r //161.55.120.117/NMML_AcousticsData/Audio_Data/Waves/",i," gs://afsc-1/bottom_mounted/",i,sep=""),intern=TRUE)
  print(out)
}
Direct Acoustic Data Upload to Cloud-SEFSC
Result:
Process ongoing - TBD
How:
Process ongoing - TBD
Impact:
Process ongoing - TBD
Contact:
Emma Beretta emma.beretta@noaa.gov for her experience with the direct upload process.
Dan Woodrich daniel.woodrich@noaa.gov if you would like to explore a similar process for your FMC acoustic data.
This script performs a sync operation (rsync), instead of copy (cp), which doesn’t just upload files but compares the files and their contents between source and destination and can upload, modify and delete files. The SEFSC users requested that only files of a certain suffix (.wav and .xml) would be uploaded to the bucket, and the rysnc option had compatible syntax to meet this request, whereas cp did not.
Script (uses gsutil which can be called in .sh in linux systems, .bat in windows systems, or system calls in programming language of choice (R, Python, MATLAB, etc):
gsutil -m rsync -r -x "^(?!.*\.(wav|xml)$).*" //sec-miami/NARW_IRA_2022/Data/NARW/NAtlST_EgSE/ gs://sefsc-1/bottom_mountedDirect Acoustic Data Upload to Cloud-SWFSC
Result:
Process ongoing - TBD
How:
Process ongoing - TBD
Impact:
Process ongoing - TBD
Contact:
Kourtney Burger kourtney.burger@noaa.gov for her experience with the direct upload process.
Dan Woodrich daniel.woodrich@noaa.gov if you would like to explore a similar process for your FMC acoustic data.
This scipt was a copy from an external hard drive, at a high level directory, which allowed for several deployments to be copied to cloud simultaneously.
Script (uses gsutil which can be called in .sh in linux systems, .bat in windows systems, or system calls in programming language of choice (R, Python, MATLAB, etc):
gsutil -m cp -r F:/* gs://swfsc-1/drifting_recorder/Later on, SWFSC also used an R script to upload during certain time windows and log progress.
# ----FUNCTIONS----
# Short recursive space-to-underscore renamer
rename_spaces <- function(path = ".") {
  # Get all files and folders, deepest first
  all_paths <- list.files(path, recursive = TRUE, full.names = TRUE, include.dirs = TRUE)
  all_paths <- all_paths[order(nchar(all_paths), decreasing = TRUE)]

  # Rename each item that contains spaces
  for (p in all_paths) {
    if (grepl(" ", basename(p))) {
      new_path <- file.path(dirname(p), gsub(" ", "_", basename(p)))
      file.rename(p, new_path)
      cat("Renamed:", basename(p), "->", basename(new_path), "\n")
    }
  }
}


# Check for weekday and hour, run between 6 AM and 6 PM on weekdays
is_weekday <- function(x){
  weekdays = c('Thursday', 'Friday', 'Monday', 'Tuesday', 'Wednesday')
  return(weekdays(x) %in% weekdays)
}

is_after_hours <- function(x){
  return(as.integer(format(x,"%H")) < 6 | as.integer(format(x, "%H")) > 18)
}


# Copy function
copy_files_to_GCP <- function(Local_dir, Cloud_dir, file_type = NULL, log_file, offHoursCopy = TRUE) {
  ## List files ####
  file_type <- paste(file_type, collapse = "|") # combine all file types to one regex (uses or expression)
  good_files <- list.files(Local_dir, pattern = file_type, full.names = TRUE, recursive = TRUE)

  ## Copy files ####
  for (file in good_files) {
    # check for after hours, will run any time if offHoursCopy = FALSE above
    if (offHoursCopy) {
      while (is_weekday(Sys.time()) & !is_after_hours(Sys.time())) {
        cat(paste('waiting...',Sys.time(), "\n"))
        Sys.sleep(600) #wait 10 minutes until trying again
      }
    }

    # build a relative GCP path to retain local folder structure
    rel_path <- gsub(paste0("^", Local_dir, "/?"), "", file)
    GCP_path <- paste0("gs://", Cloud_dir, "/", rel_path)

    # create gsutil command
    cmd <- paste0("gsutil -m cp -c -L \"", log_file, "\" \"", file, "\" \"", GCP_path, "\"")

    # pass command to process and print progress message in R console
    message("Uploading: ", file, " -> ", GCP_path)
    system(cmd)
  }


  ## Create Log ####
  # read in log file created in cmd
  log_df <- read.csv(log_file, header = TRUE)

  # subset files that successfully transferred and failed
  successful_log <- subset(log_df, Result == "OK")
  failed_log <- subset(log_df, Result == "error" | Result == "SKIPPED" | Result == "skipped")

  # number of files that successfully copied and failed
  N_files_copied <- nrow(successful_log)
  N_files_failed <- nrow(failed_log)

  # number of folders copied
  successful_log$Folder <- dirname(successful_log$Source)
  num_folders_copied <- length(unique(successful_log$Folder))

  # Total local size and total cloud size
  total_local_size <- sum(as.numeric(successful_log$Source.Size), na.rm = TRUE)
  total_bytes_transferred <- sum(as.numeric(successful_log$Bytes.Transferred), na.rm = TRUE)

  # create summary dataframe
  summary_df <- data.frame(Files_Copied = N_files_copied, N_files_failed, Folders_Copied = num_folders_copied, Total_Local_Size_bytes = total_local_size, Total_Cloud_Size_bytes = total_bytes_transferred)

  xlsx_file <- sub("\\.txt$", ".xlsx", log_file)

  # Create a new workbook
  wb <- createWorkbook()

  # Add Summary sheet
  addWorksheet(wb, "Summary")
  writeData(wb, "Summary", summary_df)

  # Add Success Files Sheet
  addWorksheet(wb, "Completed Files")
  writeData(wb, "Completed Files", successful_log)

  # Add Failed Files sheet
  addWorksheet(wb, "Failed Files")
  writeData(wb, "Failed Files", failed_log)

  # Save the workbook
  saveWorkbook(wb, xlsx_file, overwrite = TRUE)
}


# ----EXAMPLE WORKFLOW----
## ----STEP 1: Define parameters----
library(openxlsx)
# Path to Local Directory you want to copy FROM
Local_dir <- "Z:/RECORDINGS/DRIFTERS/CCES_2018/RAW"
# Path to Cloud Directory you want to copy TO
Cloud_dir <- "swfsc-1/2018_CCES_1651/drifting_recorder/audio_wav"
# Log file name with path
log_file <- paste0(getwd(), "/GCP_transfer_log_", format(Sys.time(), "%Y%m%d_%H%M%S"), ".txt")  #  (used with gsutil -L command). Leave as is, unless you want to change where the log file is saved to. This structure is built to save it to your current working directory
# Copy off hours?
offHoursCopy <- FALSE  # default is TRUE = Copy only on nights/weekends
# Copy all files? Choose file type if you do not want copy all
file_type <- c("\\.wav$", "\\.ltsa")
# file_type <- c("\\.wav$", "\\.log.xml$", "\\.accel.csv$", "\\.temp.csv$", "\\.ltsa$", "\\.flac$")


## ----STEP 2: (Optional) Rename files/folders to remove spaces----
# Spaces within your filenames/foldernames may lead to downstream processing issues
# We recommend you run this and replace any spaces in your ORIGINAL filenames/foldernames
# Risk: If you have documents, code that require the exact names (with spaces), you may have issues
# DO NOT RUN THIS LINE IF YOU NEED TO RETAIN SPACES IN YOUR FILE NAME, these functions will still work
# rename_spaces(Local_dir)


## ----STEP 3: Copy files to GCP----
# progress will be printed to the R console, check the output xlsx file for errors
copy_files_to_GCP(
  Local_dir = Local_dir,
  Cloud_dir = Cloud_dir,
  file_type = file_type,
  log_file = log_file,
  offHoursCopy = offHoursCopy
)


# --------------Final Notes:--------------
# - You must have gsutil installed and authenticated on your system
# - Make sure the GCP bucket exists and you have write permissions
# - Output Excel log will be saved to your working directory alongside your log txt file, summarizing success/failures
Google Bulk Upload
Google Transfer Appliance Set Up Checklist
To efficiently upload large data volumes (~300 TB) Google offers bulk data upload through transfer appliances. These are ultimately a rugged suitcase with a storage drive inside that can be connected to an on-premise server stack by an IT department. The appliance is shipped to you, data is copied to the appliance and encrypted, then returned to a Google data center for de-encryption and upload to the cloud. NEFSC successfully migrated 600 TB of data through the use of two transfer appliances.
Transfer appliances can be ordered directly through the GCP console. Coordinate with the cloud team if you are interested in this method. Once the transfer appliance is received, there are some permissions that need to be provided to a service account for the appliance. Details of these requirements are below.
![]()
- Enable APIs - this has been completed that the console/project level and the checklist item can simply be marked as complete.
- Authorize Service Acounts: Email Dan Woodrich daniel.woodrich@noaa.gov the link to the checklist so he can complete that step on your behalf
Planning for Cloud Operations
FMC Specific Resources
If you are interested in adding links to any specific resources for your team, contact Bella either through email or preferably by submitting an issue on this page and providing the information there.
Technnical System Documentation
PAM GCP Technical System Documentation
Overview
Summary of key decisions, technical system set-up, and use expectations for using software applications in the PAM GCP. This document is an initial way to collaborate on developing the documentation and will be transitioned to the National PAM Network GitHub once folks have access.
The acoustics SI and project design philosophy:
The ggn-nmfs-pamdata-prod-1 (“pamdata”) GCP project is designed to encompass the requirements of the PAM SI, while best prioritizing the wants and needs of the end-users and use cases, and staying near best admin practices for NMFS OCIO GCP. The relevant objectives of the PAM acoustics SI include acoustic data storage across NMFS, and passive acoustic monitoring applications that generally feed from this data. The primary end-users of the system include data owners and users, and application owners, developers, and users.
Permissions structure:
A principle and role based structure was designed for project capabilities. By defining specific principle groups (project supervisor, application developer, etc) the project is resilient to changes in individual users. Roles are given to these principle groups- for example, the project supervisors principle group is given viewing roles for most of the resources in the project for their visibility.
For quick configuration and transparency during the dynamic early stages of the project, principle and role definitions are managed by a central “project admin” principle group via terraform. NMFS OCIO best practice recommends Terraform for more transparent project resource configuration and management, and this allows for simplicity and transparency.
Alternatives: In the future, we may wish to delegate assignment of users to principle groups in a way that better resembles the true acoustics SI responsible parties (ie, supervisors can assign the project admin(s), data authorities can designate their respective data admin(s), etc). In the short term, this may result in too much unpredictability to the dynamic project.
Below are some of the currently defined principles for the project:
| Principle group name | Definition and roles |
|---|---|
| Project admin | Highest GCP admin role, controls project terraform (all principle, role, resource definitions) |
| Project supervisors | Highest SI role, has visibility across project resources, tells project admin what to do |
| Data authority | Responsible party for a particular FMC data storage bucket |
| Data admin | Administrates the contents (write/delete) of a particular storage bucket |
| Application developer | Access to software development resources |
Resources:
The pamdata project is expected to house PAM data from across NMFS, application development resources, and various applications (<30) in various states of development. Sprawl is a serious threat, in particular since many end-users of the system (owners/authorities, supervisors, users) tend to understand the system through use of a web browser as opposed to filterable api calls. In other words, resource sprawl will lead to reduced understandability of the project across the PAM SI end users and is thus carefully considered.
Data resources:
Each FMC has a distinct storage bucket for their data. This allows for some flexibility in data naming and easier isolation of permissions between FMCs. Principle groups that are designated here are data authorities (the data owner or responsible party, usually the PI of an FMC acoustics group), and the data admins (the technical users responsible for maintaining the contents of the storage bucket).
The browser allows for easy viewing of the storage buckets such that non-technical users can easily interpret the current state of the data across the NMFS FMCs. However, the tool cannot distinguish the FMC buckets from application buckets, and in order to maintain easy interpretability applications will be encouraged to consolidate to fewer buckets as appropriate. Currently, three additional buckets outside of the FMC data buckets exist: the terraform state bucket, an application intermediate bucket, and an application output bucket.
Development resources
The following resources have been stood up for application development:
Hardened docker image/server:
Based on NMFS hardened linux container and preloaded with docker. I developed an imagining pipeline for this, meaning it will be easy to keep up to date and we can make as many copies of this as developers need them. Developing on this instead of locally will be a little closer to cloud and streamlines and simplifies some assumptions. Please make sure any developers working on containers understand this option exists and the advantages in doing development here (hardware flexibility, more similar to production, built in permissions w/o key management, etc).
Docker registry:
This is where container images will be placed (whether we build or import them), and it is a key backbone of a variety of GCP container orchestration services.
Application storage buckets:
There are two new storage buckets, pamdata-app-intermediates and pamdata-app-outputs. Some of the time applications will need their own specific tiering and lifecycle, but I wanted to start with just these two, especially for early development, given that they are visible along with the FMC data buckets and we tend to like to use the console as a browsing tool to keep track of these. Keeping it to two, and dividing permissions by prefix, will keep the bucket display from getting too muddied.
Networking:
Created networks and subnets - one for application and development machines, which require ssh and NAT internet connectivity, and one for batch processing, which relies on only private google connectivity by default, but other connectivity can be added as a particular app might need.